Monthly Archives: October 2025
Wedding Printable Checklist
| Month | Task | Status |
| 12 Months | Set budget, choose venue/date | To Do |
| 9 Months | Book vendors, start dress hunt | In Progress |
| 6 Months | Send save-the-dates, order dress | To Do |
| 4 Months | Finalize menu, book makeup/hair | To Do |
| 2 Months | Send invites, confirm guest count | To Do |
| 1 Month | Get marriage license, venue walk-through | To Do |
| Week Of | Pack kit, confirm all vendors | To Do |
Why You’ll Love Having a Wedding Checklist Printable
Planning a wedding can get hectic fast. Between contacting vendors, finalizing timelines, and juggling endless details, it’s easy to lose track of what’s done and what still needs attention. That’s where a wedding checklist printable saves the day. It’s more than a to-do list—it’s your ultimate planning companion that keeps everything organized and manageable.
A checklist keeps you on track, shows your progress, and makes sure nothing gets missed. Whether your wedding is big or small, this printable keeps every step easy to follow.
- Keeps You Organized: Breaks everything down into small, manageable steps.
- Prevents Missed Deadlines: Keeps track of important dates and reminders.
- Reduces Stress: Turns overwhelming tasks into a simple, step-by-step plan.
- Boosts Efficiency: Makes it easy to delegate tasks and stay aligned with your partner or planner.
When You Should Start Using the Checklist
The best time to start is as soon as you’re engaged. Most couples begin around 12 months before their wedding, giving them enough time to book venues, secure vendors, and plan all the details without rushing.
If you’re working with a shorter timeframe, don’t worry—the checklist can easily be adapted. It’s designed to fit any schedule and keeps you on track even if you have just a few months to prepare.
- 12 Months or More: Ideal for spreading out major tasks and avoiding last-minute pressure.
- 6–9 Months: Focus on key bookings like venue, photographer, and catering.
- 3 Months or Less: Concentrate on essential logistics—attire, invitations, and vendors.
What’s Inside the Wedding Checklist Printable
The wedding checklist printable covers every stage of your planning journey. Each section is crafted to keep things simple and easy to follow, ensuring nothing slips through the cracks.
- Budget Planning: Track expenses for venues, attire, flowers, entertainment, and extra costs.
- Guest List Management: Keep an organized list for RSVPs, meal preferences, and seating.
- Vendor Tracking: Record contact details, payment deadlines, and contract dates for all your vendors.
- Attire and Beauty: Plan for dress fittings, tux rentals, accessories, and hair/makeup appointments.
- Decor and Design: Outline your color scheme, floral choices, and rental needs.
- Stationery Timeline: Track the ordering and mailing dates for invitations, save-the-dates, and thank-you notes.
- Day-of Schedule: Plan out your ceremony and reception timelines to ensure the day runs smoothly.
12-Month Wedding Planning Timeline
12 Months Out
This is when you set the foundation for your wedding. Start by setting your total budget and determining who’s contributing. Draft your guest list to estimate how many attendees you’ll have. Research and tour venues, then secure your favorite. If you’re considering a planner, this is a good time to hire one. Finally, choose your wedding date and mark it officially.
9 to 11 Months Out
At this stage, start booking the core vendors. Hire your photographer and videographer early to secure your preferred team. Schedule tastings and finalize your caterer. Shop for your dress or tux and explore entertainment options like DJs or live bands. You can also start building your wedding website to keep guests informed.
6 to 8 Months Out
Send out your save-the-dates to give guests ample time to prepare. Order your wedding dress and set up fittings. Decide on attire for your wedding party and coordinate rentals. Choose your florist and confirm floral designs. Begin shaping your décor and visual details for the ceremony and reception.
4 to 5 Months Out
This is when details start coming together. Confirm your menu and cake design with your caterer and baker. Book beauty appointments for hair and makeup trials. Arrange transportation for guests and the wedding party. Purchase your wedding rings and finalize honeymoon plans, ensuring all travel documents are ready.
2 to 3 Months Out
Send your invitations and schedule your final dress fitting. Finalize your guest count and update all vendors with the numbers. Meet with your officiant to go over ceremony details. Review your full reception timeline to make sure everything is organized and flowing properly.
Final Month
You’re in the home stretch. Obtain your marriage license and schedule a venue walk-through. Create your seating chart and finalize your vows and toasts. Confirm all vendor times and payments. Make sure everything is packed and ready for the honeymoon.
The Week Of
This is the time to relax and handle final touches. Pack an emergency kit with essentials like pins, snacks, and tissues. Get your final beauty treatments done and confirm your schedule with the bridal party. Do a rehearsal with your officiant and take a deep breath—you’ve earned it.
Tips for Using Your Printable Checklist
To make the most of your checklist, print multiple copies and keep them handy. One can go in your wedding binder, another in your planner, and a digital version for easy edits.
Highlight completed tasks to track progress visually. Use color coding for different sections like budget, attire, and decor. Review the checklist weekly with your partner or planner to make sure everything is moving along smoothly.
- Print Multiple Copies: Keep one for yourself and one for your planner or partner.
- Highlight Progress: Mark off completed tasks for motivation.
- Color Code Tasks: Make it easy to spot what’s pending.
- Review Weekly: Stay ahead by checking your progress regularly.
Where You Can Download the Checklist
You can find the wedding checklist printable in several formats depending on how you like to plan.
- PDF: Perfect for printing and keeping in a physical binder.
- Google Docs or Sheets: Great for digital editing and sharing with others.
- Editable Word Document: Useful for adding personal touches and customizing sections.
Choose the format that fits your style best. The key is making your checklist easy to access and update, so you always know what’s next.
How to Personalize the Checklist for Your Wedding
Every couple’s wedding is different, and your checklist should reflect that. You can easily add, remove, or modify sections based on your preferences or traditions.
If you’re planning a cultural or religious ceremony, add custom sections to include traditional elements. For destination weddings, include travel coordination, accommodation details, and packing lists. If you’re going DIY, create space for project tracking and supply lists.
- Cultural Additions: Include traditional customs or rituals.
- Destination Details: Add travel plans and vendor logistics.
- DIY Projects: Include craft supplies and completion timelines.
- Micro Weddings: Focus on essentials and skip non-applicable tasks.
Stress-Saving Tips to Pair with Your Checklist
A checklist keeps things organized, but staying calm is just as important. Dedicate specific days for planning so you’re not constantly in wedding mode.
Delegate tasks to friends, family, or your planner—no one said you have to do it all alone. Use apps or reminders to track payments and appointments. Most importantly, take care of yourself along the way.
- Plan Weekly: Schedule regular time for wedding planning.
- Delegate Tasks: Share responsibilities with others.
- Use Apps: Supplement your checklist with digital reminders.
- Take Breaks: Prioritize self-care to avoid burnout.
Conclusion
A wedding checklist printable makes the planning process easier, clearer, and more enjoyable. It keeps everything organized in one place, reduces the chance of missing anything, and gives you confidence as you prepare for your big day. Whether you have a year or a few weeks, a well-structured checklist ensures every box gets checked and every detail falls into place.
Key takeaway: A detailed wedding checklist printable helps you stay organized, saves time, and keeps stress levels low as you move toward your wedding day with confidence and clarity.
FAQs
Can I use the checklist if I’m planning my wedding in under three months?
Yes. Focus on the core elements—venue, vendors, attire, and paperwork—while skipping non-essential extras. The checklist can easily be adapted for tighter timelines.
What’s the best way to share the checklist with others helping me?
A shared Google Doc or editable file lets multiple people access and update the list in real time, keeping everyone on the same page.
Do I have to follow the checklist in the same order?
Not at all. It’s meant to guide you, not restrict you. Feel free to rearrange tasks based on your wedding’s specific needs and priorities.
Is it better to use digital checklists or paper versions?
Both work well. Paper copies are great for visual tracking, while digital ones are easy to edit and share. You can even use both for maximum flexibility.
Can I reuse the checklist for other celebrations?
Absolutely. You can modify it for engagement parties, anniversaries, or other large events by adjusting the sections and tasks to fit the occasion.
Wedding Checklist Timeline For Your Themed Wedding
| Timeframe | Key Tasks |
| 12+ Months Before | Choose theme, set budget, book venue |
| 9–12 Months Before | Hire vendors, plan design, shop attire |
| 6–9 Months Before | Send save-the-dates, plan decor, guest extras |
| 4–6 Months Before | Order invites, plan menu, beauty trials |
| 2–3 Months Before | Finalize vendors, music, write vows |
| 1 Month Before | Send invites, prep decor, get license |
| 1–2 Weeks Before | Confirm details, pack kit, final rehearsal |
| Wedding Day | Stick to timeline, enjoy, capture moments |
| Post-Wedding | Send thank-yous, preserve keepsakes, share photos |
12+ Months Before the Wedding: Time to Dream and Plan Big
Planning a themed wedding starts with dreaming big. This stage is all about shaping your vision and laying the foundation for the rest of the process.
- Choose your theme: Think about what represents you both—maybe it’s rustic boho, vintage glam, celestial chic, or something totally unique. Your theme will guide all your choices moving forward.
- Set your budget: Figure out how much you want to spend overall and break it down by category. Themed weddings often need extra funds for décor, outfits, and props.
- Estimate your guest list: You don’t need final numbers yet, but a rough headcount helps you choose the right venue size and manage your budget.
- Book your venue: Pick a location that fits your theme. A barn works great for rustic charm, while a botanical garden is perfect for a romantic nature theme.
- Consider a wedding planner: A planner with experience in themed weddings can bring your ideas to life, help manage logistics, and connect you with the right vendors.
9–12 Months Before: Lock in the Big Stuff
Now that you have your theme and venue, it’s time to lock in vendors and start turning your vision into reality.
- Hire essential vendors: Book your photographer, videographer, caterer, and entertainment early. Make sure they’re on board with your theme and have experience working with custom setups.
- Design your theme details: Start building a mood board to capture the look and feel you’re aiming for. Think about colors, lighting, textures, and materials that support your theme.
- Shop for your attire: Begin the search for wedding outfits that fit your theme. Whether it’s a classic gown, custom suit, or period-inspired look, order early to allow time for fittings.
- Build your wedding website: Include key details and sprinkle in your theme throughout the design. This is also a great place to give guests a heads-up on attire, travel plans, and the general vibe.
6–9 Months Before: Theme Details Take Center Stage
With the big decisions made, it’s time to dive into the design and guest experience.
- Send save-the-dates: Use your theme’s colors and design to introduce the look to your guests. It’s the first taste of what they can expect.
- Finalize decor choices: Confirm your plans for centerpieces, table settings, signage, and backdrops. You can rent items, buy them, or make your own.
- Plan the guest experience: Think about how guests will interact with your theme. This could include photo booths, themed favors, or immersive spaces like a lounge area or welcome table.
- Book transportation and accommodations: Coordinate travel that fits your theme, whether it’s a vintage car, horse-drawn carriage, or shuttle service. Reserve hotel blocks early if you’re hosting out-of-town guests.
4–6 Months Before: Getting Into the Nitty Gritty
This part of the planning is all about pulling the vision together and ironing out details.
- Order invitations: Choose invites that echo your theme. Add fun touches like custom illustrations, wax seals, or textured paper.
- Plan your menu and drinks: Coordinate with your caterer to offer dishes and drinks that suit the mood. A garden-themed wedding might call for fresh seasonal dishes, while a vintage theme could include retro cocktails.
- Schedule hair and makeup trials: Try out your desired looks with professionals who understand your theme. This gives you time to make adjustments or try something new.
- Plan your pre-wedding events: Carry your theme into the bridal shower or bachelor/bachelorette party. It doesn’t need to match exactly, but it can share a style or tone for consistency.
2–3 Months Before: Time to Pull Everything Together
You’re getting close, so now it’s time to finalize plans and prep for the big day.
- Do a venue walkthrough: Visit your venue again and walk through the layout with your planner or decorator. Take note of where everything will go and how it will flow.
- Confirm vendor details: Double-check times, setup needs, and responsibilities. Make sure each vendor understands how the theme plays into their part of the event.
- Create your music playlist: Work with your DJ or band to build a soundtrack that matches your theme, whether that’s romantic ballads, jazz standards, or indie folk.
- Write your vows and ceremony script: Add personal and theme-related touches to your vows or ceremony readings for a truly unique experience.
1 Month Before: Final Touches and Real Talk
The countdown is on, and now’s the time to wrap up all the remaining details.
- Send out invitations: Get them in the mail and start collecting RSVPs. Create a tracking system to keep everything organized.
- Create signage and place cards: Use your theme in creative ways with calligraphy, wood signs, acrylic pieces, or other custom materials.
- Finish DIY projects or order last-minute decor: Wrap up any handmade items like table numbers, welcome signs, or photo booth props.
- Get your marriage license: Research local requirements and make sure you apply in time to receive it before the ceremony.
1–2 Weeks Before: Final Countdown
The finish line is in sight. It’s all about confirming logistics and preparing for the day itself.
- Confirm guest count: Finalize your seating chart and share numbers with your caterer, venue, and coordinator.
- Pack an emergency kit: Include bandages, mints, hair spray, makeup, extra buttons, sewing kit, pain relievers, and anything else that might be helpful on the day.
- Break in your shoes and outfits: Wear them around the house to avoid discomfort on the big day.
- Hold a final walkthrough and rehearsal: Go over the ceremony with your wedding party and officiant. Double-check arrival times and make sure everyone knows their role.
Wedding Day: Time to Celebrate
It’s your time to shine, and everything you’ve planned is about to come together.
- Stick to your timeline: Let your coordinator or point person keep things running on time. Focus on enjoying each moment.
- Let your theme shine naturally: You’ve done the work—now let the atmosphere speak for itself. Guests will appreciate all the thoughtful touches.
- Capture the magic: Tell your photographer what special details to focus on. From the decor to the reactions, make sure the theme gets documented.
Post-Wedding: Wrapping It All Up
Once the party’s over, there’s still a little more to do.
- Send thank-you notes: Use cards that match your theme and personalize your message for each guest or gift.
- Preserve important items: Whether it’s your bouquet, dress, or decor, think about what you want to save and how you’ll store or display it.
- Share your photos: Make an online gallery or print a photo book to look back on your favorite moments and share them with loved ones.
Conclusion
A themed wedding is more than just matching decor—it’s about creating an atmosphere that reflects your story. When you follow a timeline like this, you’re not just planning a party—you’re designing an experience that’s personal, fun, and unforgettable. From the first mood board to the final thank-you card, staying organized helps bring every piece of your vision together without unnecessary stress. When the day comes, you’ll get to soak it all in knowing every detail was thoughtfully planned.
Key Takeaway: A themed wedding feels effortless when it’s built on a smart, structured plan. A clear timeline gives your ideas direction and ensures your theme is consistent, from save-the-dates to your final dance.
FAQs
How do I keep my theme from feeling overdone?
Stick to a few strong elements—like your color scheme, stationery, and key decor. Avoid applying the theme to every single aspect so it still feels classy and balanced.
What’s the best way to introduce the theme to guests?
Start with your save-the-dates and invitations. Use your website to expand on the theme and include attire suggestions or fun details.
Is it worth hiring a planner for a themed wedding?
Yes, especially if your theme is elaborate or involves custom setups. A planner helps you avoid costly mistakes and ensures your vision comes to life seamlessly.
Can I change my theme partway through planning?
You can, but it’s easier to do earlier in the process. Changing your theme later on may require rebooking vendors or replacing decor, which adds time and expense.
How do I make guests comfortable with the theme?
Use your website and invites to provide context. Encourage guests to participate but don’t force strict dress codes. Fun extras like props or themed favors help them join in naturally.
Wedding Checklist 2
Blog post imported from: https://www.invitesweddings.com/b/wedding-checklist-2
Wedding Checklist
| Timeframe | Tasks |
| 12+ Months Before | Set budget, draft guest list, book venue |
| 9–12 Months Before | Hire vendors, shop for dress, send save-the-dates |
| 6–9 Months Before | Order attire, plan décor, book hotel blocks |
| 3–6 Months Before | Mail invitations, schedule beauty trials, order cake |
| 1–3 Months Before | Apply for license, confirm vendors, buy rings |
| 1–4 Weeks Before | Final headcount, print materials, pack honeymoon items |
| Wedding Week | Rehearsal, final payments, prep emergency kit |
| Wedding Day | Eat, follow timeline, enjoy every moment |
| After the Wedding | Send thank-you cards, review vendors, preserve dress |
12+ Months Before the Wedding: Start With the Big Stuff
Planning starts here—the foundation of your wedding day depends on the early decisions you make now.
- Set Your Budget: Talk with your partner and families about your overall budget. Decide how you’ll divide expenses and where to allocate funds, like the venue, food, attire, and photography. Keep a small buffer aside for unexpected costs.
- Draft Your Guest List: Create a rough list to help with venue size, catering, and seating. Divide guests into essential and optional categories for flexibility.
- Choose the Wedding Date: Pick a date that fits your timeline and planning needs. Keep in mind the season, holidays, and how convenient it’ll be for guests to travel.
- Book the Venue: Secure your ceremony and reception venues early, especially if you have a popular location in mind.
- Hire a Planner (Optional): A wedding planner can manage logistics, vendor coordination, and timelines, saving you stress later on.
9–12 Months Before the Wedding: Book the Key Players
This stage is about getting your team together and building the atmosphere for your big day.
- Book Key Vendors: Secure your photographer, videographer, caterer, florist, band or DJ, and officiant. The best vendors are often booked far in advance.
- Start Dress Shopping: Begin searching for your wedding gown. It often takes months for the dress to arrive and be altered to perfection.
- Launch the Wedding Website: Create a simple website where guests can find event details, RSVP, and check your registry.
- Send Save-the-Dates: Send these out about 8–12 months before the wedding, especially if guests are traveling long distances.
- Plan the Engagement Party: Celebrate with family and friends. It’s a fun way to share your engagement news and kick off the countdown.
6–9 Months Before the Wedding: Get into the Details
Now it’s time to focus on style, décor, and travel arrangements.
- Order Wedding Attire: Order your dress and accessories like shoes, veil, and jewelry. Also, pick outfits for your bridal party and schedule fittings.
- Finalize Theme and Décor: Choose your color scheme and decorations. Share your design ideas with your florist and planner.
- Book Guest Accommodations: Reserve hotel room blocks near your venue for out-of-town guests. Provide details on your website for convenience.
- Plan the Honeymoon: Book flights, accommodations, and excursions. Make sure your passports are up to date and travel insurance is in place.
3–6 Months Before the Wedding: Finalize the Fun Stuff
You’re halfway there—now it’s about refining details and personal touches.
- Send Invitations: Mail formal invitations about three to four months before the wedding. Include RSVP details and meal selections.
- Schedule Hair and Makeup Trials: Try different looks to see what feels right. Bring inspiration photos for reference.
- Host the Bridal Shower: Have your bridal party or family organize a shower to celebrate you before the big day.
- Plan the Rehearsal Dinner: Book a location, decide on a guest list, and plan a menu that sets a relaxed mood.
- Order the Wedding Cake: Schedule tastings with your baker, select flavors, and finalize the design.
- Write Your Vows: Begin drafting your vows or ceremony script to reflect your love story and values.
1–3 Months Before the Wedding: Tie Up Loose Ends
As the wedding approaches, the small details make all the difference.
- Apply for Your Marriage License: Research your local requirements and schedule your appointment. Bring necessary documents and identification.
- Confirm Vendors: Review contracts, verify arrival times, and confirm final payments. Share your event schedule with everyone.
- Create a Day-of Timeline: Plan out the wedding day from start to finish, including vendor arrivals, ceremony time, meal service, and speeches.
- Schedule Final Fittings: Try on your wedding attire and make final adjustments for the perfect fit.
- Purchase Wedding Bands: Choose your rings and allow time for resizing or engraving.
1–4 Weeks Before the Wedding: Final Prep Mode
You’re in the home stretch—this is where all your hard work pays off.
- Confirm Guest Count: Provide your final headcount to your caterer, venue, and rental company.
- Arrange the Seating Chart: Start with family and close friends, then build out the rest of the tables thoughtfully.
- Print Stationery: Finalize menus, table numbers, seating charts, and signage for your event.
- Pack for the Honeymoon: Create a packing list so you don’t forget essentials like travel documents and medications.
- Break In Your Shoes: Wear your wedding shoes around the house to make them more comfortable.
Wedding Week Checklist: Keep It Smooth and Simple
The last week before the wedding is all about balance—finishing tasks and taking care of yourself.
- Pamper Yourself: Get a manicure, pedicure, or spa treatment to relax before the big day.
- Rehearsal and Dinner: Go through the ceremony with your wedding party, then enjoy dinner with family and friends.
- Handle Final Payments: Label envelopes for tips and balances, and assign someone to distribute them.
- Pack an Emergency Kit: Include fashion tape, safety pins, mints, deodorant, sewing supplies, tissues, and stain remover.
- Prepare Outfits: Steam your dress, organize accessories, and check that everything is in perfect condition.
Wedding Day: Take It All In
Today is your moment—enjoy every part of it.
- Start with a Good Breakfast: Eat a light, energizing meal to keep your energy steady.
- Stick to the Timeline: Trust your planner or point person to keep things moving smoothly.
- Stay Present: Focus on the love and celebration. Take in every moment—you’ll want to remember it forever.
After the Wedding: Wrap Things Up
Your wedding may be over, but a few finishing touches help close the chapter beautifully.
- Send Thank-You Cards: Write personalized notes to guests and vendors within a few weeks after the event.
- Preserve Your Dress: Take your gown to a specialist for proper cleaning and preservation.
- Return Rentals: Make sure all borrowed or rented items are returned on time.
- Review Vendors: Leave reviews for your vendors to share your experience and help future couples.
- Organize Photos: Once you receive your pictures, back them up digitally and create albums to keep your memories safe.
Conclusion
Planning a wedding doesn’t have to feel overwhelming. When you follow a detailed checklist, you keep everything organized, stay calm, and enjoy the process instead of stressing through it. Every step—from setting your budget to sending thank-you notes—brings you closer to creating a day that feels perfectly yours. The key is balance: plan carefully but remember to savor the moments along the way.
Key Takeaway: A good wedding checklist keeps you organized and on schedule. It helps you manage your time and enjoy the planning process, making sure your big day runs smoothly and feels unforgettable.
FAQs
What’s a realistic timeline for wedding planning?
Most couples start planning about 12 to 18 months ahead. This allows enough time to book venues and vendors without rushing.
Can we skip sending save-the-dates?
You can, but save-the-dates are helpful for destination weddings or if many guests will travel long distances.
What should go into a wedding emergency kit?
Include essentials like bobby pins, breath mints, sewing supplies, tissues, safety pins, and pain relievers for last-minute fixes.
Is it okay to have a small bridal party?
Absolutely. There’s no rule for size—your bridal party should include whoever means the most to you.
When should final payments to vendors be made?
Most vendors require payment one to two weeks before the wedding. Check your contracts and arrange envelopes ahead of time.
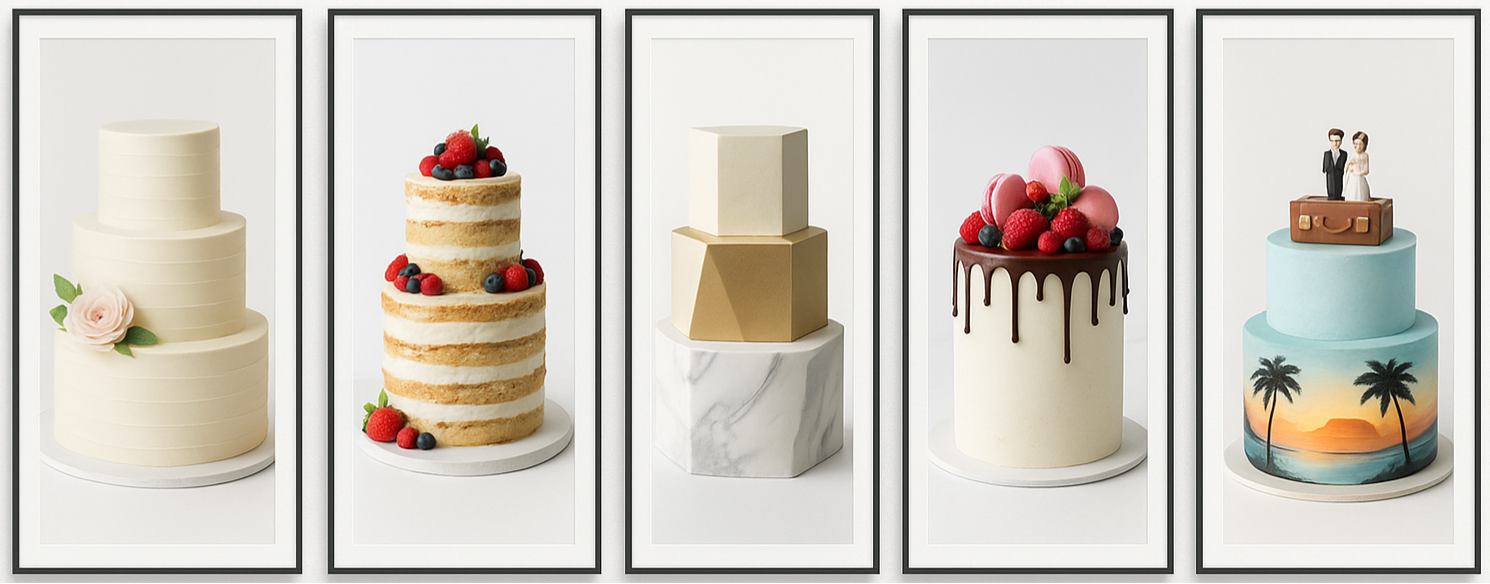
Unique Wedding Cakes
| Flavor Combination | Best Season |
| Lavender & Lemon | Spring |
| Chai & Honey | Fall |
| Matcha & Raspberry | Summer |
| Earl Grey & Vanilla Bean | Winter |
| Blood Orange & Cardamom | Fall |
| Rosewater & Almond | Spring |
| Ginger & Lime | Summer |
| Chocolate & Bourbon | Winter |
Why Couples Go for Unique Wedding Cakes
A wedding cake is more than a dessert—it’s part of the celebration’s identity. Choosing a unique design gives your wedding personality, style, and meaning. It sets the mood, complements your theme, and adds a memorable moment when it’s finally cut and shared. Couples today see their cakes as an opportunity to express creativity and individuality, turning the centerpiece into a reflection of who they are.
Trendy Wedding Cake Designs That Stand Out
Wedding cake design trends are constantly evolving, and bakers are turning these creations into edible art. Below are some of the most popular and eye-catching styles.
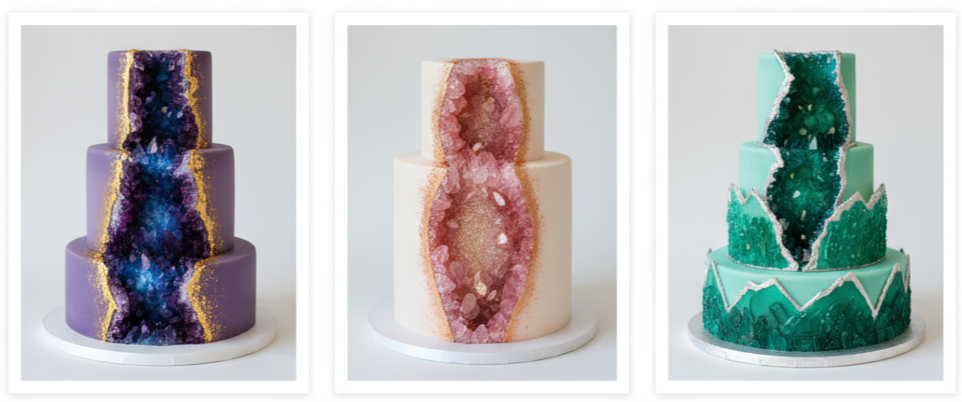
Geode Cakes
These cakes look like dazzling crystals carved from the earth. Made with rock candy and edible glitter, they shimmer beautifully under light and add a magical touch to any reception.
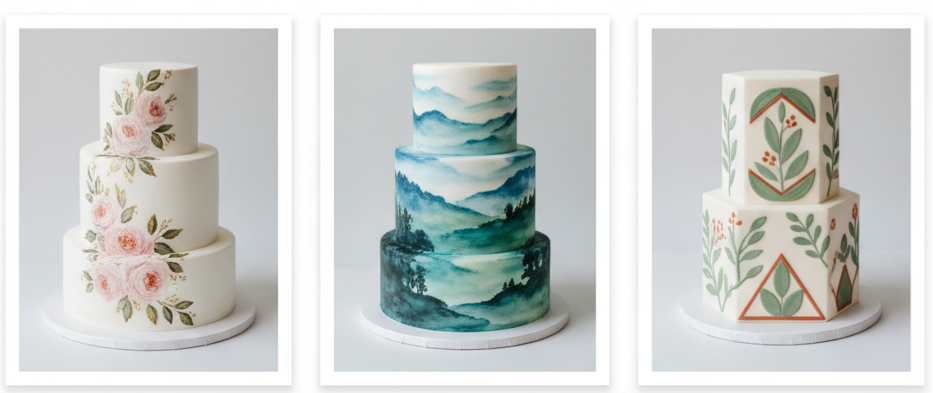
Hand-Painted Cakes
Bakers use edible paints and brushes to create intricate artwork directly on the cake. Designs can range from floral patterns to watercolor landscapes, making each cake completely one of a kind.
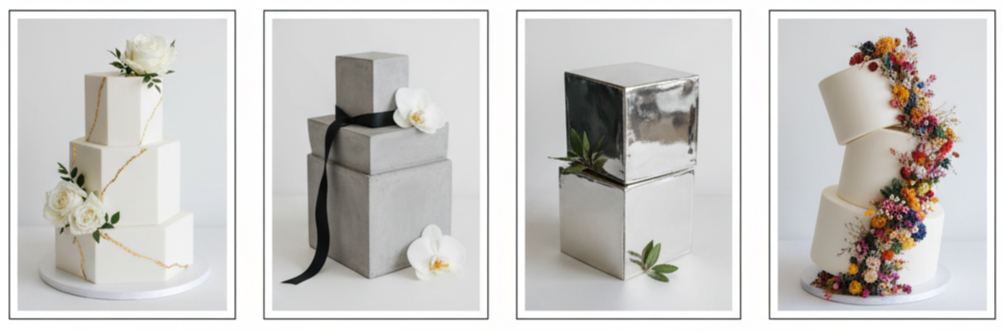
Asymmetrical or Shaped Tiers
Forget standard round tiers—couples are embracing hexagonal, square, and irregular shapes. These nontraditional layers add a modern edge that guests will definitely notice.
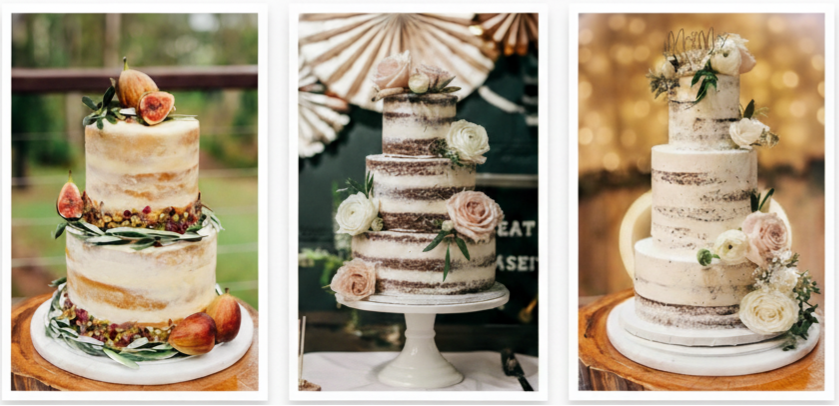
Naked and Semi-Naked Cakes
With minimal frosting, these cakes show off their layers and fillings. Decorated with berries, flowers, or greenery, they’re perfect for rustic or outdoor weddings.
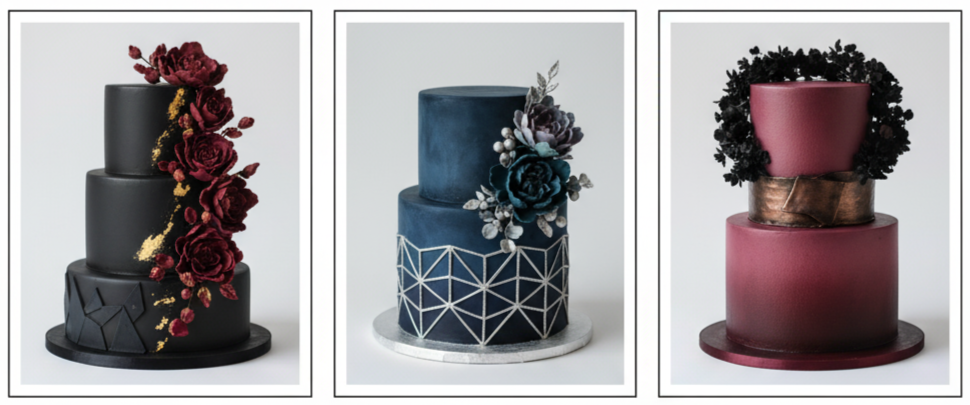
Dark and Dramatic Cakes
Deep hues like black, navy, or burgundy create a bold statement. Metallic accents or moody florals can soften the intensity while maintaining a luxurious vibe.
Flavors That Break the Mold
Today’s wedding cakes are as adventurous in flavor as they are in design. Couples are stepping beyond traditional tastes and exploring creative combinations.
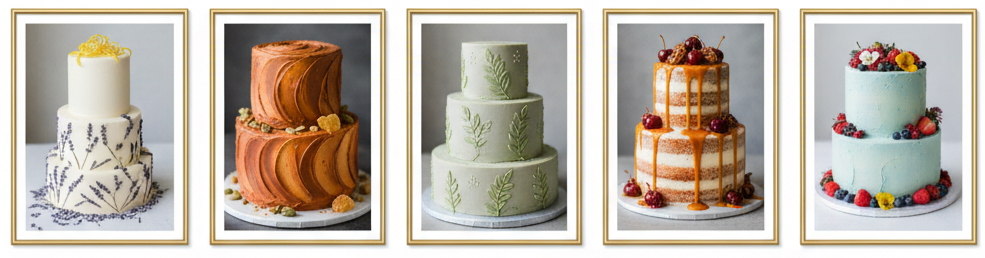
- Floral and Herbal Infusions: Flavors like lavender-lemon, rose-almond, or basil-strawberry bring freshness and sophistication. They’re subtle yet distinctive, ideal for spring or garden-themed weddings.
- Citrus and Spice Pairings: Combinations such as blood orange-cardamom, chai-honey, or ginger-lime offer warmth and contrast, making each bite memorable.
- Tea-Infused Creations: Matcha, Earl Grey, and chai tea lend depth and aroma, transforming a simple sponge into a refined and aromatic dessert.
- Boozy Twists: Rum-soaked vanilla, bourbon buttercream, or Champagne-infused cake layers add celebration-ready flair for adults who want something extra indulgent.
- Dietary-Friendly Options: Bakers now whip up vegan, gluten-free, and allergy-friendly cakes that taste just as good as the classics. Swapping in things like almond flour or coconut milk keeps them rich and delicious.
Key takeaway: Unique cake flavors are just as important as the look. Choosing unconventional pairings gives your guests an experience they won’t forget and ensures your cake stands out in taste as much as design.
Creative Ways to Show Off Your Cake
Your wedding cake deserves its moment to shine, and presentation plays a huge role in making that happen. The right display can turn a beautiful cake into a showstopping piece of art.

- Suspended Cakes: Using clear acrylic platforms, bakers can make your cake appear as though it’s floating. It’s modern, unexpected, and perfect for weddings with dramatic flair.
- Decorated Cake Tables: Surround your cake with coordinated props, flowers, and fabrics that match your wedding colors. It ties everything together visually and makes the dessert table feel intentional.
- Bold Backdrops: Floral walls, neon signs, or fabric panels draw attention to your cake and create perfect photo opportunities. The backdrop adds dimension and helps the cake stand out in the space.
- Interactive Displays: Rotating stands or clear multi-level platforms let guests see every side of your design. It’s a small detail that makes a big impact.
Personal Touches That Tell Your Story
A wedding cake should say something about the couple, not just look pretty. Adding custom touches gives it meaning and makes it feel like a part of your story.
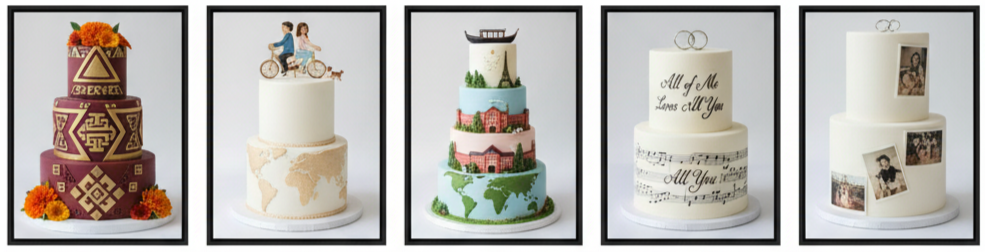
- Cultural Details: Use traditional symbols, patterns, or regional flavors that reflect your backgrounds. It’s a heartfelt way to include family heritage in the celebration.
- Custom Toppers: From fun figurines to elegant monograms, toppers personalize your cake instantly. Some couples even feature mini replicas of their pets or shared hobbies.
- Storytelling Through Tiers: Each tier can represent a different part of your journey—like where you met, your travels, or milestones together. It’s both symbolic and charming.
- Edible Prints and Quotes: Food-safe technology allows for edible photos or meaningful phrases printed directly on the cake. Whether it’s your initials or favorite song lyrics, it adds a sentimental layer.
Tips for Working With a Cake Designer
Creating a unique wedding cake takes collaboration between you and your baker. Here’s how to make that process smooth and successful.
- Do Your Research: Start by reviewing the baker’s portfolio to understand their range and style. Look for clean finishes, consistent creativity, and designs that match your taste.
- Come Prepared for Consultations: Bring inspiration photos, wedding colors, and theme ideas. Having a vision helps the designer translate your ideas into a cohesive concept.
- Discuss Budget Early: Be upfront about what you want to spend. Skilled bakers can suggest design adjustments that keep costs manageable without compromising quality.
- Schedule Tastings: This step is a must. Experiment with different flavor combinations to find your perfect match. It’s also a great way to gauge the baker’s flavor balance and texture.
- Plan Delivery and Setup: Confirm that the designer handles delivery and setup. Some intricate cakes require on-site assembly to ensure everything looks flawless.
Conclusion
Choosing a unique wedding cake isn’t just about dessert—it’s about creating a centerpiece that represents your love story. Whether you prefer a bold black-tiered design, a delicately painted floral piece, or an asymmetrical modern shape, the goal is to make it personal. Combining creative flavors, meaningful design choices, and professional presentation transforms your cake into more than just something to eat—it becomes part of the wedding’s visual and emotional memory.
Key takeaway: The most unforgettable wedding cakes blend creativity with authenticity. By combining bold design, meaningful details, and unexpected flavors, you’ll have a wedding cake that perfectly reflects who you are as a couple.
FAQs
How early should we book a cake designer?
It’s best to book at least three to six months before your wedding date. If your cake design is detailed or you’re getting married during peak season, try to schedule even earlier to secure your spot.
Can each tier have a different flavor?
Yes, and it’s a popular choice! Offering multiple flavors keeps guests happy and lets you showcase several favorites without committing to just one.
Is it possible to freeze a tier for our anniversary?
Wrap it in plastic and foil, seal it in an airtight container, and freeze it to keep it fresh for your anniversary.
Do bakers offer fake layers to reduce cost?
Many do. These decorative dummy tiers look identical to real ones and are perfect for achieving a grand appearance while saving money. Guests will never know the difference.
Are there alternatives to traditional wedding cakes?
Absolutely. Some couples choose macaron towers, donut walls, cake pops, or croquembouche displays. These creative alternatives still offer wow factor while giving a modern twist to the dessert table.
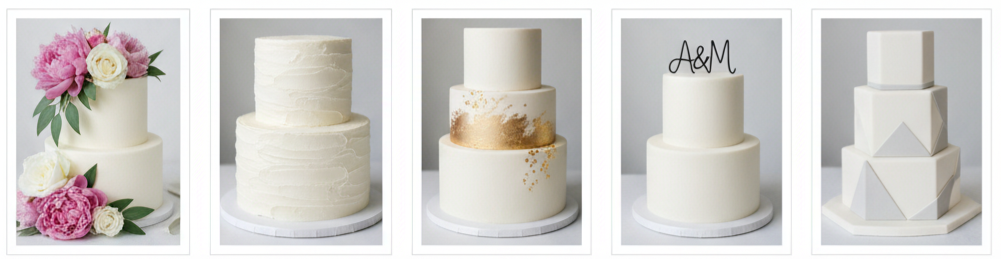
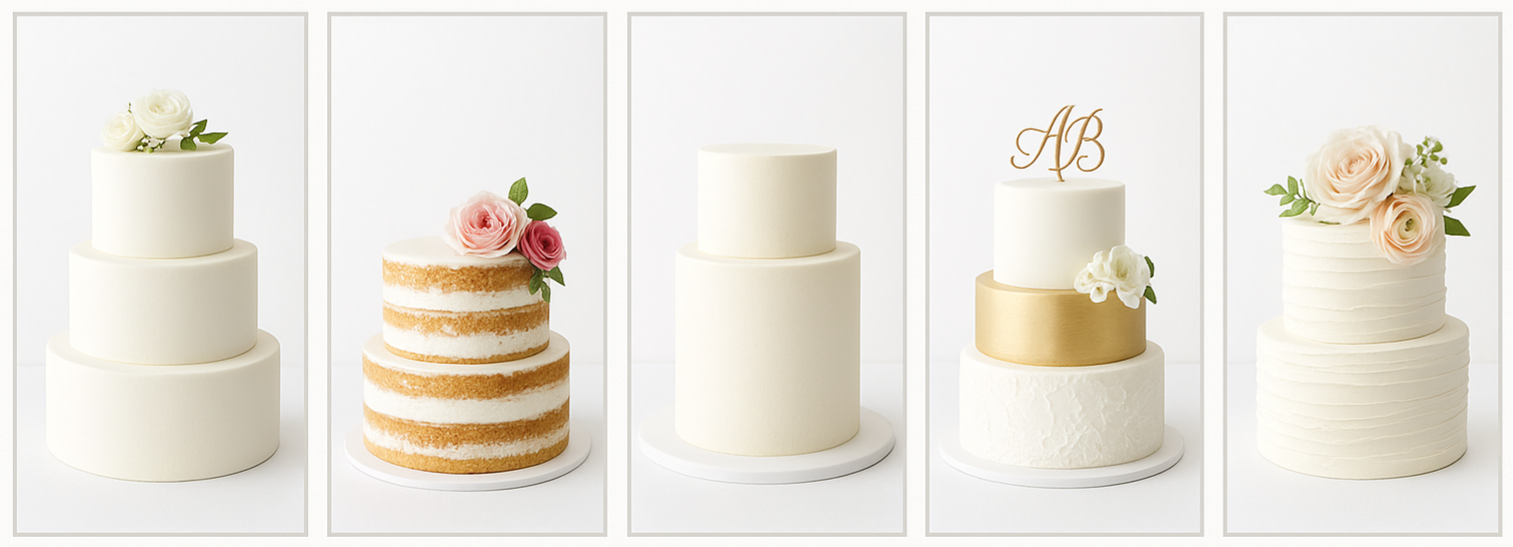
Simple Wedding Cakes
| Cake Style | Look | Best For | Frosting Type |
| Single-Tier Minimalist | Clean and elegant | Small weddings or elopements | Buttercream or fondant |
| Two-Tier Classic | Balanced and timeless | Medium-sized weddings | Buttercream |
| Naked Cake | Exposed layers, rustic feel | Outdoor or casual weddings | Light buttercream |
| Semi-Naked Cake | Thin frosting coat, modern | Rustic-chic themes | Buttercream |
| White-on-White Design | Smooth and textured white | Traditional or formal weddings | Fondant or buttercream |
| Buttercream Finish | Soft and natural texture | Any wedding style | Buttercream |
Why Choose a Simple Wedding Cake
Simple wedding cakes are becoming a go-to for couples who want elegance without going overboard. These cakes are timeless, stylish, and work with any wedding vibe—whether you’re planning a cozy backyard celebration or a grand venue affair. A minimal cake doesn’t demand attention, yet it stands out for all the right reasons.
They’re also easier on the budget and logistics. With less fuss in the design, bakers get to focus more on the flavor and quality of ingredients. That means you’re not just getting something that looks good, but something that tastes amazing too. And isn’t that the whole point of cake?
Popular Styles of Simple Wedding Cakes
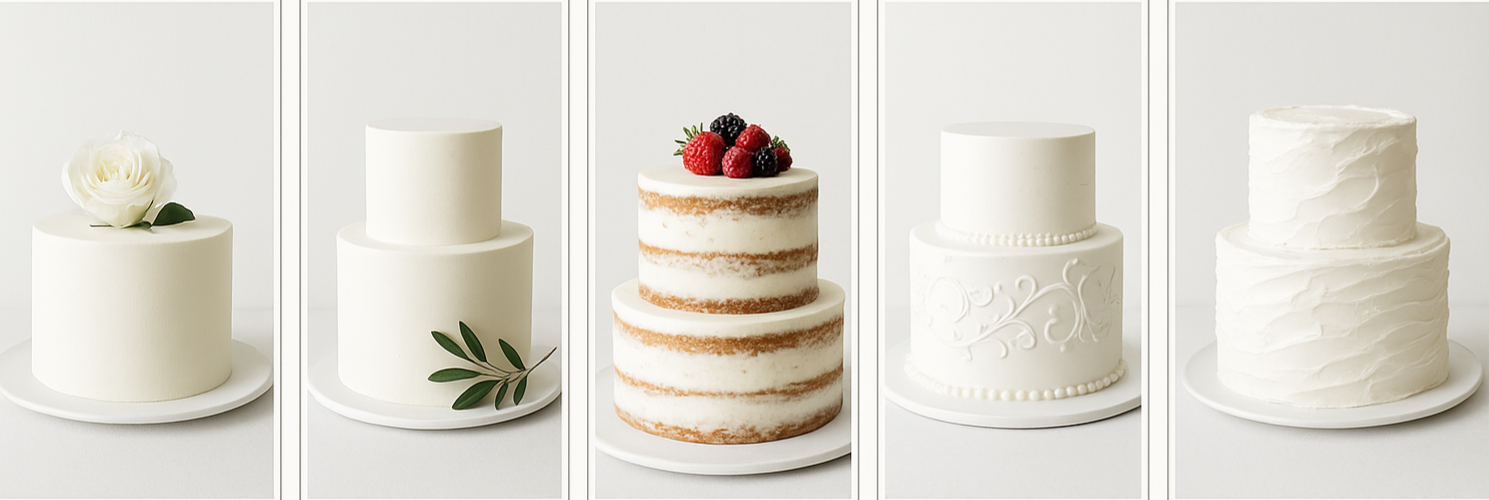
- Single-tier minimalist cakes: Perfect for small weddings or elopements, these cakes are understated and polished. A smooth buttercream or fondant finish with maybe a flower on top is all it takes to make a statement.
- Two-tier classics: These work well for mid-sized weddings and offer just the right amount of room for subtle details like a topper or greenery. They maintain that clean look without losing impact.
- Naked and semi-naked cakes: Naked cakes skip outer frosting to show off the layers, while semi-naked ones use a thin coat of buttercream for a soft, rustic vibe. Add fruit or fresh flowers, and they’re instantly stylish.
- White-on-white designs: Using all-white icing and décor, these cakes are soft, elegant, and perfect for a traditional look. You can add texture with piping or fondant patterns to keep it interesting.
- Buttercream over fondant: Buttercream has a natural, soft finish and offers more flavor and flexibility. It’s great for textured designs and gives the cake a fresh, smooth look.
Elegant Design Ideas Without Overdoing It
- Fresh flowers and greenery: A few blooms go a long way. Flowers like peonies or roses and simple greens like eucalyptus add just enough pop without cluttering the design.
- Textured icing techniques: Instead of piling on decorations, try textured finishes—combed lines, soft waves, or spatula strokes add depth without extra elements.
- Metallic accents: Edible gold or silver foil, brushed shimmer, or metallic ribbon trims can elevate a cake’s look while still keeping it sleek.
- Minimalist cake toppers: Try simple initials, clear acrylics, or thin wire toppers with your name or wedding date. They add a touch of personality without being loud.
- Geometric shapes: Hexagonal tiers or fondant cutouts with modern edges can give the cake structure and creativity without going over the top.
Flavors That Match Simplicity
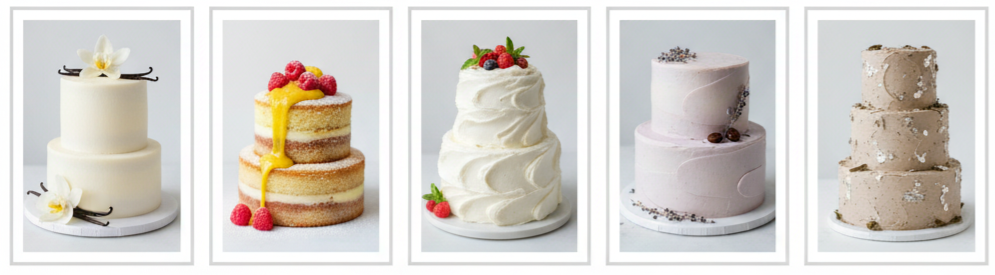
- Classic base flavors: Vanilla bean, almond, lemon, and white chocolate are always safe and delicious. These traditional flavors keep things elegant and appeal to most guests.
- Seasonal fruit fillings: Raspberry, lemon curd, or even fig preserves bring fresh and zesty notes. They pair beautifully with light sponge cakes and add natural flavor.
- Light and whipped frostings: Go for cream cheese, mascarpone, whipped ganache, or meringue buttercream. They’re not as heavy as traditional buttercream but just as tasty.
- Flavored buttercream options: Add subtle infusions like rose, espresso, lavender, or earl grey to give your cake that extra flair while keeping the profile refined.
Display and Presentation Tips
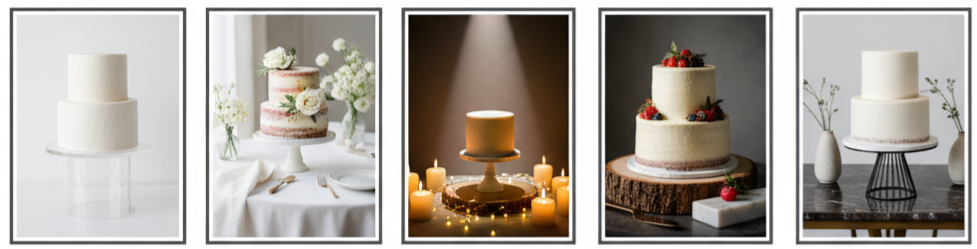
- Simple cake stands: Use acrylic, ceramic, or sleek metal stands. They lift your cake for better viewing while staying minimal and chic.
- Clean table decor: Stick with neutral linens and subtle florals. It makes the cake stand out without distractions.
- Accent lighting: Use candles, fairy lights, or soft spotlights to highlight the cake—especially during evening receptions.
- Natural elements: Wood slabs, glass risers, or marble bases tie in nicely with rustic, modern, or minimal themes. They give the display texture without adding clutter.
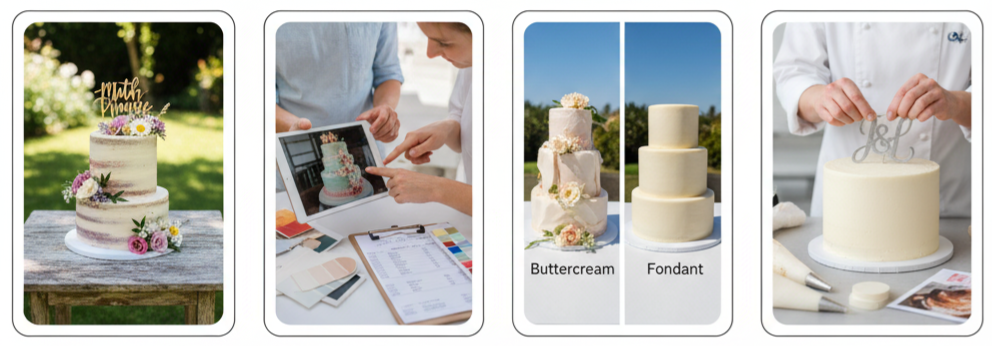
How to Communicate Your Vision to Your Baker
- Create a visual mood board: Collect images from Pinterest or Instagram and show your baker what you like. Point out the colors, shapes, or textures that caught your eye.
- Discuss guest count and budget: Let them know how many people you’re expecting. That helps determine the size and whether you’ll need sheet cakes or display cakes.
- Talk about ingredients and dietary needs: Share any allergies or dietary restrictions early. Bakers can offer tasty alternatives if they have time to plan.
- Confirm delivery and setup plans: Clarify who’s delivering the cake, who’s setting it up, and where it’s going. This keeps everything smooth on the big day.
- Request a tasting session: Trying different flavors ahead of time helps you choose the perfect combo. Some bakers offer take-home tastings or sit-down sessions.
Conclusion
Simple wedding cakes might look understated, but they deliver on both style and flavor. Clean designs, fresh ingredients, and subtle details create a perfect mix of beauty and taste. From a one-tier buttercream cake to a two-tier naked cake with berries, simplicity lets your style shine—without the stress.
Key Takeaway: A simple wedding cake makes a lasting impression through refined design and rich flavor. It doesn’t need to be elaborate to feel special—just thoughtful, well-made, and a true reflection of your celebration.
{stop article}
FAQs
What’s the best way to store a simple wedding cake before the big day?
Keep the cake refrigerated in a cool, dry space to preserve its texture and flavor. Make sure it’s stored in a closed box to avoid absorbing odors from other foods.
Can I use faux tiers to make my cake appear taller?
Yes, faux tiers are a creative and cost-effective way to add height without needing extra servings. They blend in seamlessly and photograph beautifully.
Should the wedding cake design match the dress or venue style?
While it doesn’t have to match exactly, using similar colors, textures, or details can create a cohesive look across the wedding design.
How far in advance should I order my simple wedding cake?
Place your order 4–6 months ahead to lock in your date, especially during peak wedding season.
Is it okay to skip a formal cake cutting ceremony?
Absolutely. Many couples choose to serve the cake casually or offer alternative desserts like cupcakes or mini cakes instead of doing a formal cutting.
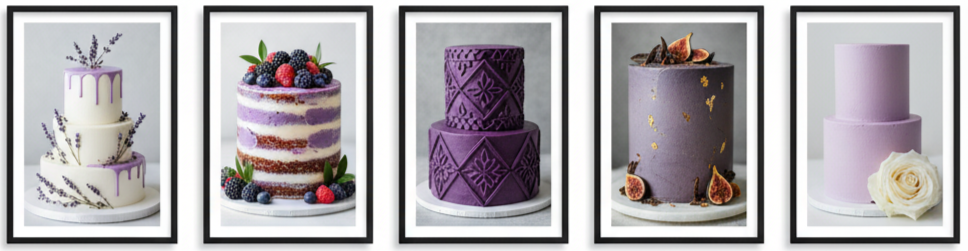
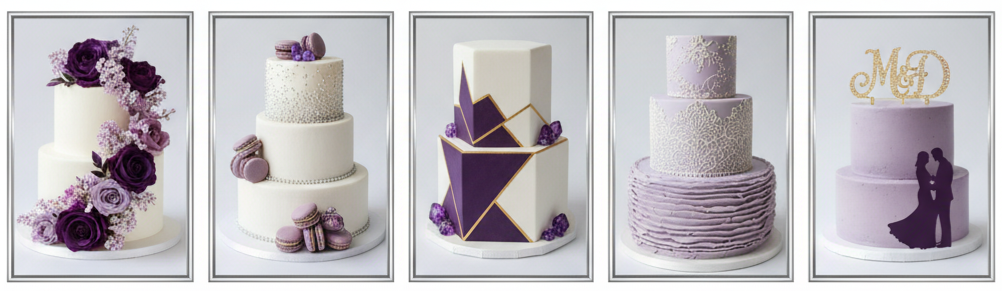
Purple Wedding Cakes
| Flavor | Pairs Well With |
| Lavender | Lemon, Vanilla, Honey |
| Blackberry | Vanilla, Cream Cheese |
| Blueberry | Lemon, White Chocolate |
| Ube (Purple Yam) | Coconut, Condensed Milk |
| Earl Grey & Fig | Almond, Dark Chocolate |
| Vanilla | Purple Buttercream, Berries |
Why Choose Purple for Your Wedding Cake
Choosing purple for your wedding cake adds instant elegance and charm. It’s a color that stands for royalty, creativity, and sophistication, making it ideal for couples who want something unique and meaningful. Purple blends beautifully with different wedding themes—whether modern, romantic, rustic, or vintage—and works well in every season.
Soft lavender tones feel light and romantic for spring weddings, while deep plum shades bring warmth and richness to fall and winter celebrations. The best part is that purple suits any setting, from garden ceremonies to glamorous ballroom receptions. Whether it’s your accent color or the main focus, it creates a stunning statement that ties your whole look together.
Popular Purple Wedding Cake Styles
Purple wedding cakes come in all kinds of styles, each with its own flair and personality.
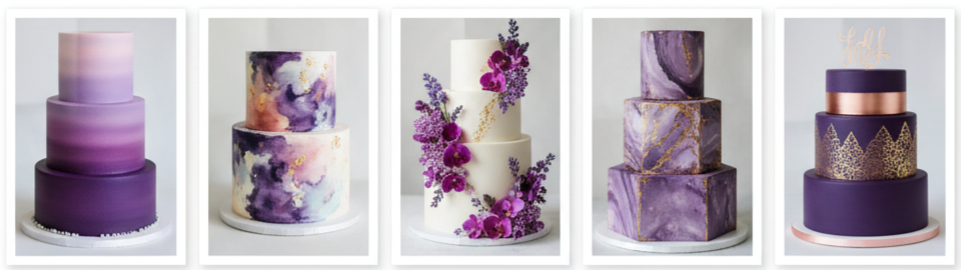
- Ombre Cakes: These are trendy and stylish, showing a beautiful gradient from deep purple at the bottom to lighter lavender at the top. They’re modern yet soft, creating a perfect balance of drama and elegance.
- Watercolor Cakes: This style gives your cake a dreamy, artistic look. The baker paints purple tones directly onto the icing, blending them with blush, blue, or ivory for a romantic and whimsical effect.
- Floral Cakes: Flowers and weddings always go hand in hand, and purple blooms make the perfect cake decoration. Using lavender, orchids, or lilacs adds a natural, luxurious touch that matches your floral arrangements.
- Marble Cakes: If you love modern style, purple marble designs with streaks of gray or white mimic natural stone and give your cake a sleek finish.
- Metallic Accents: For something truly show-stopping, combine purple with gold, silver, or rose gold details. Metallic accents add glamour and bring that royal edge to your wedding dessert table.
Flavors That Pair Well With Purple Design
A cake this beautiful deserves flavors that taste just as good as it looks. Purple cakes often feature unique and flavorful ingredients that complement their color.
- Lavender: This delicate floral flavor pairs perfectly with vanilla, lemon, or honey. It’s light, fragrant, and ideal for spring weddings.
- Blackberry and Blueberry: These berries not only add natural purple coloring but also a juicy sweetness that pairs well with buttercream or vanilla sponge layers.
- Ube (Purple Yam): A favorite in Filipino cuisine, ube offers a nutty, rich, and subtly sweet flavor that’s both eye-catching and delicious.
- Earl Grey and Fig: A sophisticated blend that combines tea and fruit for an elegant, mature flavor profile.
- Classic Vanilla with Purple Buttercream: If you prefer traditional taste, keep the cake simple with a classic vanilla sponge and add the purple theme through the frosting.
Decoration Ideas for Purple Wedding Cakes
Decorating a purple wedding cake is where creativity truly shines. You can go minimal or go all out depending on your style.
- Fresh or Edible Flowers: Lilacs, orchids, lavender, and roses in purple hues make your cake look fresh and romantic. They can cascade down the tiers or be placed delicately on top.
- Macarons and Sugar Pearls: Adding purple macarons or edible pearls in white or silver gives your cake texture and elegance while keeping it fun.
- Geometric Accents: Shapes like hexagons or triangles in purple and metallic colors give your cake a modern and artistic edge.
- Lace and Ruffles: Soft ruffles or lace patterns made from fondant or buttercream add that romantic bridal feel.
- Custom Cake Toppers: A monogram, silhouette, or figurine in purple or gold ties the entire design together and makes it feel personal.
How to Coordinate with Your Wedding Theme
A purple wedding cake should flow naturally with your wedding theme. Think of it as part of the overall picture, not just dessert.
Match the cake with other wedding details like your bridesmaids’ dresses, floral arrangements, or table settings. For instance, plum fondant ribbons can complement deep purple gowns, while soft lavender decorations pair beautifully with garden-style weddings.
Purple also looks stunning with contrasting tones. Gold and purple create a luxurious, royal feel, while sage and lavender give off a soft, organic vibe. The trick is to balance the color—use purple as your highlight and pair it with neutrals to keep the design elegant and cohesive.
Tips for Ordering a Purple Wedding Cake
Getting your purple wedding cake right takes planning and good communication with your baker.
- Schedule a Cake Tasting: Test out flavor combinations to make sure the taste matches the design.
- Request Color Samples: Ask for icing swatches so your baker can perfectly match your wedding palette.
- Discuss Delivery Details: Some frosting types don’t handle heat well, so ensure your cake will stay flawless during transport.
- Check the Baker’s Portfolio: Look for someone with experience making colorful or themed cakes, as they’ll understand how to handle purple shades effectively.
- Confirm the Cake Size: Choose the number of tiers based on your guest count and venue. A tall, slim cake can look elegant without creating too many leftovers.
Real Wedding Inspiration
Real weddings are a great way to see how couples have used purple cakes to express their style.
A romantic garden wedding might feature a three-tier cake decorated with cascading lavender sugar flowers that echo the floral arch. For modern industrial weddings, a marble-style purple cake with gold accents brings sleek sophistication.
Boho beach weddings look amazing with watercolor purple cakes brushed with blush tones and topped with edible flowers. Vintage ballroom events are perfect for deep plum fondant cakes with intricate lace detailing and gold trim. And for rustic barn weddings, semi-naked cakes with light purple buttercream and fresh lavender sprigs create a cozy, natural charm.
Conclusion
Purple wedding cakes are more than a trend—they’re a creative way to show off your personality and wedding theme. From soft pastels to rich violets, every shade of purple brings something special to the celebration. Whether your style leans modern, rustic, or classic, a purple cake can tie everything together beautifully. It’s the perfect mix of flavor, design, and meaning, turning dessert into an unforgettable centerpiece.
Key Takeaway: A purple wedding cake adds elegance, creativity, and character to your celebration. It can be customized through different shades, designs, and flavors to match your theme perfectly. Whether bold or subtle, it’s a statement piece that reflects your taste and love story.
FAQs
What’s the best frosting for a purple wedding cake?
Fondant is great for a clean, polished look, while buttercream offers a soft, textured finish. The best choice depends on your theme, flavor, and temperature on your wedding day.
Can a purple cake still look traditional?
Yes! Keep a white base and add subtle purple details like ribbons, flowers, or ombre accents for a classic design with a modern twist.
Is it safe to use real flowers on the cake?
Absolutely, as long as they’re food-safe and pesticide-free. Many florists and bakers work together to make sure the blooms are safe to use.
What’s the best way to achieve a natural purple color?
You can use natural ingredients like ube, blueberries, or blackberries to tint your frosting or batter. The color will be softer but completely natural.
How much does a purple wedding cake cost?
The price depends on design complexity, ingredients, and the number of tiers. Intricate details, metallic finishes, or handmade sugar flowers usually raise the cost, so it’s best to discuss your budget with your baker early on.
Publix Wedding Cakes
| Cake Size | Approx. Servings | Starting Price |
| Two‑Tier | 30–50 guests | $175–$300 (basic design) |
| Three‑Tier | 75–100 guests | $300–$400 (standard design) |
| Four‑Tier or Larger | 100+ guests | $450+ (custom design) |
Why So Many Couples Choose Publix Wedding Cakes
Publix wedding cakes are a favorite for couples who want a cake that looks elegant, tastes amazing, and fits within their wedding budget. The bakery’s reputation for quality, freshness, and attention to detail has made it a go-to option for weddings big and small. With so many locations, it’s convenient to plan your order close to home, and you’ll get expert guidance from experienced decorators who know how to turn your ideas into a reality. Publix also makes it easy to personalize your cake, offering countless designs, flavors, and finishing touches.
- Affordable Prices: Publix cakes deliver professional quality at a fraction of boutique bakery costs.
- Trusted Bakers: Every Publix bakery has trained decorators ready to assist with design and flavor combinations.
- Convenient Consultations: Many locations offer appointments where you can sample flavors and discuss custom designs.
Publix makes it possible to enjoy a beautiful, delicious wedding cake that doesn’t compromise on quality or creativity.
Cake Styles and Designs to Fit Your Wedding Vibe
When it comes to cake design, Publix offers options for every kind of celebration. Couples who love traditional elegance can go for multi-tiered cakes with smooth fondant or classic buttercream. Those planning outdoor or rustic weddings often choose “naked” cakes—lightly frosted with fresh flowers or fruit for a natural look.
If your style leans modern, Publix can create clean, minimalist cakes in soft tones or sleek finishes. For themed weddings, decorators can add custom elements such as monogram toppers, floral accents, or metallic highlights. You can even browse design books at your local Publix for ideas or bring in your own photos to show exactly what you have in mind.
Every design is made to match your vision—whether that’s something timeless, trendy, or completely unique.
Flavor Choices That Guests Will Actually Talk About
Publix wedding cakes are known for their rich, fresh flavors. With a wide variety of cake, filling, and frosting combinations, there’s something for everyone to enjoy.

- Cake Flavors: Choose from vanilla, chocolate, marble, red velvet, lemon, strawberry, or carrot. Each one is freshly baked for your event.
- Filling Options: Add delicious layers of strawberry or raspberry preserves, lemon or vanilla custard, chocolate ganache, Bavarian cream, or whipped icing.
- Frosting Choices: Pick from classic buttercream, chocolate buttercream, whipped icing, or cream cheese frosting. Select stores also offer fondant for a smooth, high-end finish.
Publix also allows you to mix and match flavors between tiers. That means one layer could be red velvet with cream cheese frosting, while another might be lemon with raspberry filling. It’s a fun way to give your guests more variety.
How to Make It Your Own
Your wedding cake should show off your style, and Publix makes that easy. Their bakery team customizes everything from frosting color to decorations to fit your theme perfectly.
- Personal Touches: Add your initials, a favorite flower, or a topper that fits your story.
- Color Coordination: Match the frosting shade to your wedding colors or go for soft ombré effects.
- Unique Finishes: Choose textured frosting styles like ruffles, rosettes, or smooth gradients.
- Natural Accents: Fresh flowers, fruit, or edible metallics can elevate your design.
During your consultation, you’ll be able to preview design sketches or examples to ensure your cake turns out exactly as you imagine.
Here’s How the Ordering Process Works
Ordering your Publix wedding cake is easy, but it’s best to start early so everything goes smoothly.
Follow these simple steps:
- Schedule a Consultation: Visit your nearest Publix Bakery and set up an appointment at least 4–8 weeks before your wedding.
- Pick Your Design and Size: Decide how many guests you’ll have and what style of cake suits your event.
- Select Flavors: Sample combinations through tasting boxes, where available.
- Place Your Order: Confirm your choices, pay the deposit, and lock in your date.
- Plan Pickup or Delivery: Some stores offer delivery for an additional fee—check with your location to confirm availability.
Make sure to review your order details carefully and double-check the pickup or delivery time a few days before your wedding.
What You Can Expect to Pay
Publix wedding cakes are known for their budget-friendly prices, making them a great option for couples who want quality without the high cost.

- Two-Tier Cakes: Generally start around $175 and serve up to 50 guests.
- Three-Tier Cakes: Typically cost between $250 and $400 and serve around 100 guests.
- Four-Tier Cakes or Larger: Start at $450, with prices increasing for intricate designs or premium ingredients.
Add-ons like fondant, edible decorations, or specialty fillings may raise the price slightly. Some locations charge a delivery fee, depending on distance and setup requirements. Even with these extras, Publix remains a top value compared to boutique bakeries offering similar designs.
Tips for a Smooth Cake Experience
A little preparation goes a long way toward ensuring your Publix wedding cake turns out perfect.
- Plan Ahead: Book your consultation at least two months before the wedding.
- Know Your Guest Count: This helps determine your cake size and tier number.
- Bring Inspiration Photos: Visuals help your decorator understand your vision.
- Ask for Samples: If available, tasting boxes can help you finalize your flavor decisions.
- Review Your Order: Double-check all details—flavors, decorations, and delivery—before confirming.
By organizing these details early, you’ll avoid last-minute stress and enjoy a cake that’s exactly what you envisioned.
Conclusion
Publix wedding cakes are a budget-friendly way to get the custom cake you want. They’re fresh, beautifully made, and easy to match with your theme. Whether it’s a small backyard wedding or a big event, Publix delivers great taste and reliable service from start to finish.
Key takeaway: Publix wedding cakes strike the right balance of style, flavor, and price, which is why so many couples choose them for a cake that looks great and tastes just as good.
FAQs
Does Publix offer dairy-free or vegan wedding cake options?
Some Publix bakeries can accommodate dairy-free or egg-free requests, but vegan options vary by location. Always check with your local store to confirm what’s available.
Can I freeze my Publix wedding cake for later?
Yes, you can freeze your cake’s top tier for your anniversary—just wrap it well in plastic and foil to keep it fresh.
How do I transport the cake safely if delivery isn’t available?
Keep the cake on a flat, stable surface inside an air-conditioned vehicle. Avoid placing it on seats or uneven areas to prevent shifting during transport.
Are tasting boxes available at all Publix locations?
Not every Publix offers tasting boxes, so it’s best to call ahead and ask your store whether they provide samples for wedding cake consultations.
Can I make changes to my order after placing it?
Most locations allow adjustments to your order, but it’s best to make changes early. Requests made less than a week before the event may not be possible, depending on the bakery’s schedule.
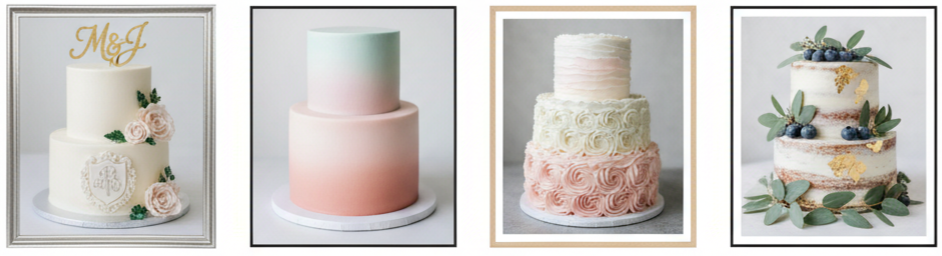
Pictures of Wedding Cakes
| Season | Colors | Flavors | Decorations |
| Spring | Pastels, blush, mint | Lemon, vanilla, almond | Fresh flowers, greenery |
| Summer | Bright, coral, aqua | Berry, coconut, citrus | Tropical blooms, fruit slices |
| Fall | Burgundy, gold, copper | Pumpkin, caramel, spice | Dried leaves, figs, cinnamon |
| Winter | Silver, white, icy blue | Chocolate, red velvet, mocha | Snowflakes, sugar crystals, berries |
Why Pictures of Wedding Cakes Matter
Browsing wedding cake photos is a simple way to figure out what you like. Instead of explaining a vague style, just show your baker a picture that matches your vision—it saves time and clears up any confusion.
Using pictures makes it easier to spot patterns in your preferences. Maybe you’re drawn to soft buttercream textures or dramatic sugar flowers. Pictures also help your cake designer understand your vision more clearly, so there’s less risk of miscommunication. Plus, having a collection of inspiration makes the entire planning process feel more fun and less stressful.
Popular Wedding Cake Styles (With Photos as Inspiration)
There are so many different wedding cake styles out there, and seeing pictures of them side-by-side really brings those options to life.
- Classic tiered cakes: These are the traditional stacked cakes with clean layers, usually covered in smooth buttercream or fondant. Soft colors like ivory, white, and pastel pink are popular, and they often feature floral accents for a romantic feel.
- Naked and semi-naked cakes: These cakes skip the outer frosting to reveal the cake layers underneath. They have a rustic, unfinished look that’s perfect for outdoor or casual weddings. Decorations usually include berries, flowers, or powdered sugar.
- Modern geometric cakes: These cakes go for sharp angles, structured lines, and metallic finishes. Marble effects and color blocking add a sleek, high-end feel. They’re great for couples who like a bold, artistic look.
- Drip cakes: These feature a smooth frosting base with ganache or caramel dripping down the sides. The tops are often decked out with fruit, macarons, or playful toppings. They mix elegance with a little bit of fun.
- Themed cakes: These cakes reflect the couple’s interests or wedding theme. Whether it’s travel, literature, or pop culture, themed cakes often include edible decorations, custom toppers, or hand-painted details.
Unique Wedding Cake Ideas That Capture Attention
If you want your cake to stand out, there are plenty of creative ideas that go beyond the usual.
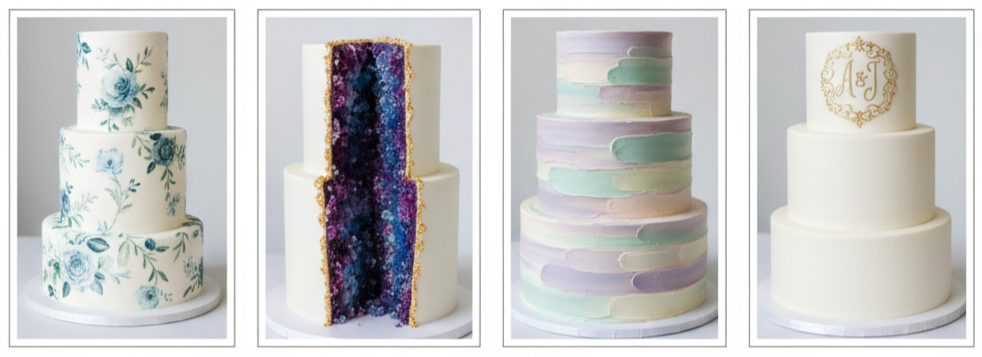
- Hand-painted cakes: These are like edible canvases. Bakers paint floral designs, patterns, or scenes directly onto the cake using food-safe colors. Each one is a work of art and no two are ever the same.
- Geode-inspired cakes: These mimic the look of crystal formations using sugar and rock candy. Jewel tones like emerald, amethyst, and sapphire give the cake a sparkly, high-impact look.
- Watercolor buttercream cakes: These cakes use soft brushstroke patterns to create a blended watercolor effect. They look dreamy and romantic—perfect for spring weddings.
- Monogrammed cakes: Adding your initials or a custom crest gives your cake a formal, polished vibe. Monograms can be piped, stenciled, or made with metallic detailing.
Seasonal Wedding Cake Designs and Inspiration
Choosing a cake that matches your wedding season is a great way to tie everything together visually.
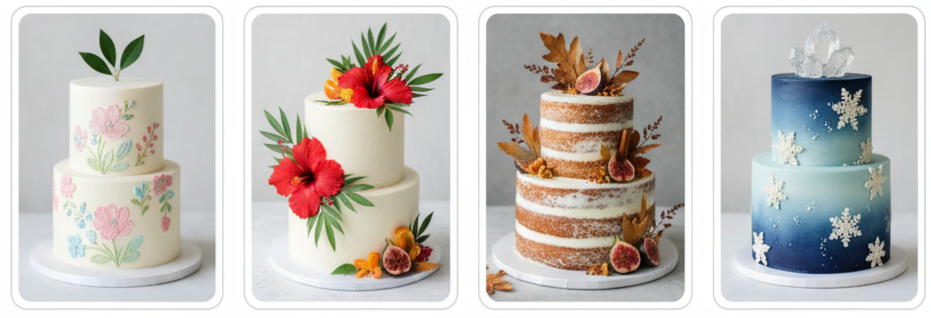
- Spring cakes: These cakes feel fresh and light. They often feature pastel colors, fresh flowers, and greenery. Popular flavors include lemon, vanilla, or almond.
- Summer cakes: Bright and colorful cakes work well in summer. Tropical flowers, citrus accents, and beachy textures all look right at home. Flavors like coconut, passionfruit, or berry are common.
- Fall cakes: Earthy tones and rich textures dominate fall designs. Decorations might include dried flowers, figs, leaves, or even cinnamon sticks. Fall flavors like caramel, pumpkin, or spice cake are popular choices.
- Winter cakes: Cool-toned colors like silver, icy blue, or deep plum pair beautifully with frosted textures or shimmer details. Sugar crystals, snowflakes, or velvet finishes give winter cakes a magical feel.
Tips for Choosing a Wedding Cake Based on Pictures
Looking at photos is helpful, but there are a few things to consider before locking in your cake design.
- Match your theme: Choose a design that fits the tone of your event. A towering fondant cake might feel too formal for a backyard wedding, while a semi-naked cake may feel too casual for a ballroom.
- Keep your budget in mind: Bring your favorite pictures to your baker and ask what’s realistic within your budget. Detailed decorations or custom designs can increase the cost quickly.
- Think about the weather: Buttercream melts in heat, while fondant holds up better in outdoor settings. Consider your venue and time of year when choosing finishes and materials.
- Taste comes first: Don’t forget the cake needs to taste great, too. Always book a tasting session to sample flavors before committing to a design.
- Customize your design: You don’t have to copy a cake photo exactly. Feel free to adjust colors, add personal touches, or swap elements that don’t fit your style.
Where to Find the Best Wedding Cake Pictures Online
The internet is packed with cake inspiration, and you don’t need to look far to find beautiful designs.
- Pinterest: It’s one of the best places to start. You can search by season, color, theme, or style and pin your favorites to a board for easy reference.
- Instagram: Check hashtags like #weddingcakeinspo or #weddingcakesofinstagram to see real-time examples from bakeries and decorators around the world.
- Bakery websites: Most professional cake makers post galleries of their work online. It’s a great way to see what they specialize in and whether their style matches your taste.
- Wedding blogs and planning platforms: Sites like The Knot or WeddingWire have curated galleries filled with cake pictures from real weddings, styled shoots, and professional showcases.
- Photography portfolios: Wedding photographers often share full galleries, including cake-cutting moments. These photos show how cakes look in real-life settings with natural lighting and background decor.
Conclusion
Pictures of wedding cakes are the starting point for finding a design that fits your wedding. They give you a clearer sense of what’s out there, help you communicate your ideas, and offer endless ways to personalize your dessert. Whether you’re into traditional elegance or modern flair, using visual inspiration makes it easier to find a cake that matches your theme, taste, and personality.
Key takeaway: Let your cake photos be your guide. They’ll help shape your ideas, streamline the design process, and give your baker a crystal-clear vision to bring to life.
FAQs
How much time do I need to plan my wedding cake design?
It’s best to start about 3 to 6 months in advance. This gives you enough time for tastings, design revisions, and coordinating with your baker’s schedule.
Is it possible to have a completely original cake design?
Yes! Most bakers love working with custom ideas. You can mix elements from different photos or bring in totally new concepts.
Are some decorations not safe for outdoor weddings?
Definitely. Heat and humidity can affect soft frosting, sugar work, or fresh flowers. Your baker can suggest more durable alternatives for outdoor events.
Can I use fake tiers to make my cake taller?
Yes. Styrofoam tiers are a great way to add height without extra servings. They’re often used to create the look of a large cake without the full cost.
Should I bring photos to my tasting or design meeting?
Absolutely. Photos make it easier for your baker to understand what you like and recommend flavor or decoration options that fit your vision.
Fall Wedding Cakes
| Cake Flavor | Best Filling | Topping Idea |
| Pumpkin Spice | Cream Cheese Frosting | Candied Pecans |
| Apple Cider | Caramel Buttercream | Sliced Apples & Cinnamon Dust |
| Maple Walnut | Brown Butter Frosting | Crushed Walnuts |
| Chai Spice | Honey Vanilla Buttercream | Edible Flowers or Gold Leaf |
| Gingerbread | Mascarpone Cream | Dried Orange Slices |
| Carrot Cake | Cream Cheese Frosting | Sugared Cranberries |
Seasonal Flavors That Steal the Show
Fall wedding cakes stand out thanks to their cozy, nostalgic flavors. They bring a warm, comforting vibe that fits perfectly with the season’s festive feel.
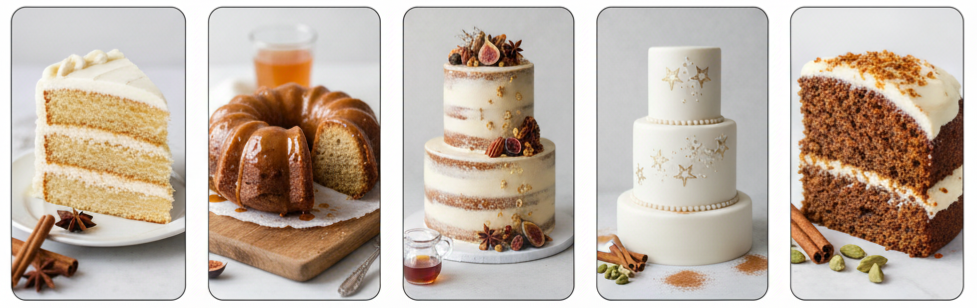
- Pumpkin Spice: The classic fall flavor combines cinnamon, nutmeg, and clove for that familiar autumn comfort. It’s even better when paired with smooth cream cheese frosting.
- Apple Cider: This flavor adds a crisp sweetness with a hint of tartness. It tastes incredible with brown sugar or caramel buttercream for a cozy finish.
- Maple: Maple brings a deep, natural sweetness that’s perfect for the season. It pairs beautifully with toasted pecans, walnuts, or brown butter frosting.
- Chai Spice: With cardamom, ginger, and cinnamon, chai offers warmth and sophistication. It’s a great option if you want something different but still fall-inspired.
- Carrot and Gingerbread: For those who love a bolder taste, these cakes offer hearty texture and rich spice. Cream cheese or mascarpone frosting adds a smooth finish that balances the flavor.
Designs and Color Themes That Feel Like Fall
The look of a fall wedding cake can be just as exciting as the flavor. With the season’s signature color palette and natural textures, fall cakes can be both rustic and elegant.
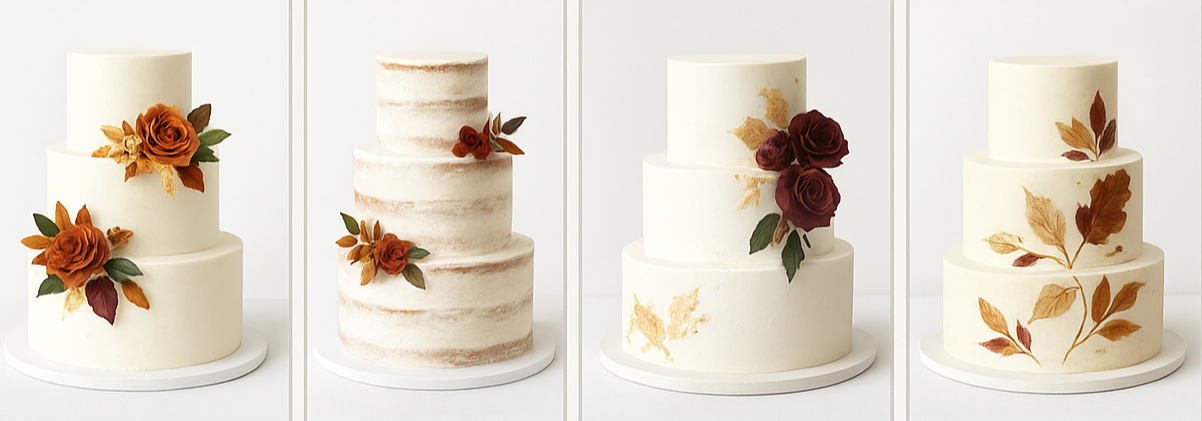
- Warm Hues: Fall colors like burnt orange, burgundy, gold, and deep green bring warmth and depth to any design. They pop against white frosting or fondant for contrast.
- Rustic Finishes: Naked and semi-naked cakes highlight natural cake layers while keeping the look casual yet charming. Some couples choose lightly textured buttercream for an unfinished, homey touch.
- Modern Elegance: Fondant cakes with metallic accents—like gold leaf or copper detailing—add a refined touch that still fits the fall mood.
- Floral and Painted Designs: Hand-painted leaves or edible dried flowers pressed into buttercream bring artistry and texture to the presentation.
Fall-Inspired Cake Decorations That Wow
Autumn is all about nature, and fall wedding cakes often borrow inspiration from it. Decorations made from seasonal ingredients and materials give the cake a natural, organic beauty.
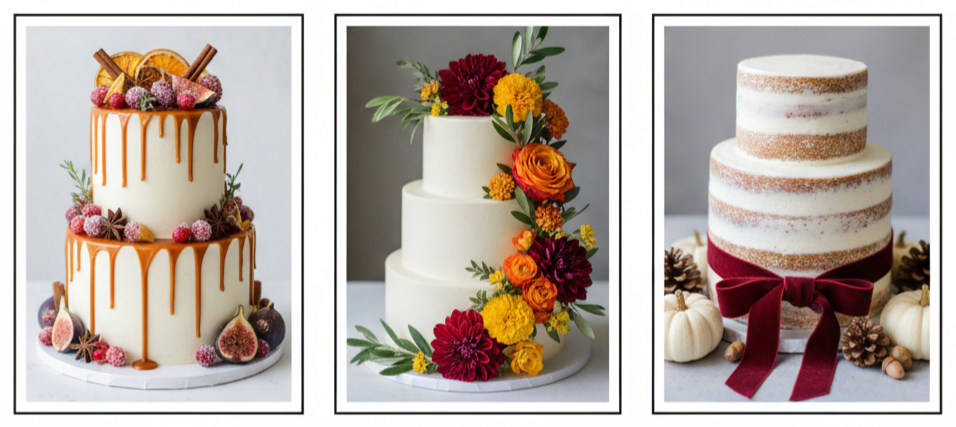
- Edible Additions: Sugared cranberries, caramel-drizzled figs, and dried orange slices add color, flavor, and sparkle. Even small touches like cinnamon sticks or star anise enhance the aroma and presentation.
- Seasonal Florals: Flowers like dahlias, roses, and marigolds in rich hues pair beautifully with greenery such as eucalyptus or olive branches. They create a lush, textured look that feels very autumnal.
- Natural Touches: Mini pumpkins, pinecones, or acorns placed around the cake or stand bring a rustic vibe. Add velvet ribbons or lace to the tiers for extra charm.
Cake Shapes and How to Show Them Off
The design of your cake goes beyond the flavor—it’s also about how you present it. A well-styled display turns your wedding cake into a centerpiece that guests will remember.
- Tiered Cakes: Multi-tier cakes remain a popular choice, offering multiple flavor options and more room for creative designs.
- Single-Tier Cakes: Perfect for smaller weddings, these cakes use bold designs or color choices to make a statement.
- Creative Displays: Wooden slabs, antique trays, or hanging cake tables give your setup a unique touch. Surrounding the cake with candles or fall leaves adds warmth and romance.
- Dessert Alternatives: Couples sometimes opt for cupcake towers, mini bundt cakes, or dessert bars filled with pies and cookies. These provide variety while keeping the fall theme intact.
Helpful Tips for Choosing Your Fall Wedding Cake
Choosing a wedding cake in the fall takes more thought than just picking a flavor. You want it to complement your overall style and work well with your venue and season.
- Match Your Theme: A barn wedding pairs well with a rustic buttercream cake topped with wildflowers, while an indoor ballroom might call for a smooth fondant cake with gold details.
- Use Seasonal Ingredients: Talk to your baker about what’s in season—like apples, pears, or spices—so your cake tastes its best.
- Plan for the Weather: Fall can swing from warm to cool quickly. If your wedding is outdoors, make sure your cake won’t melt or collapse in warmer weather.
- Book Early: Since fall is a peak wedding season, lock in your baker as early as possible to secure your date.
- Stay True to You: Trends come and go, but your wedding cake should reflect your personal style. Whether it’s simple or elaborate, make sure it feels like your own.
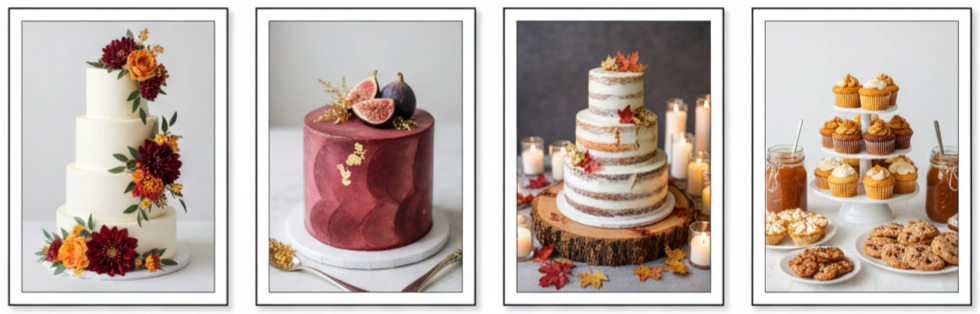
Real-Life Fall Wedding Cake Ideas Worth Borrowing
Sometimes it helps to see what other couples have done to get inspired for your own celebration. Fall wedding cakes can range from rustic and cozy to polished and refined.
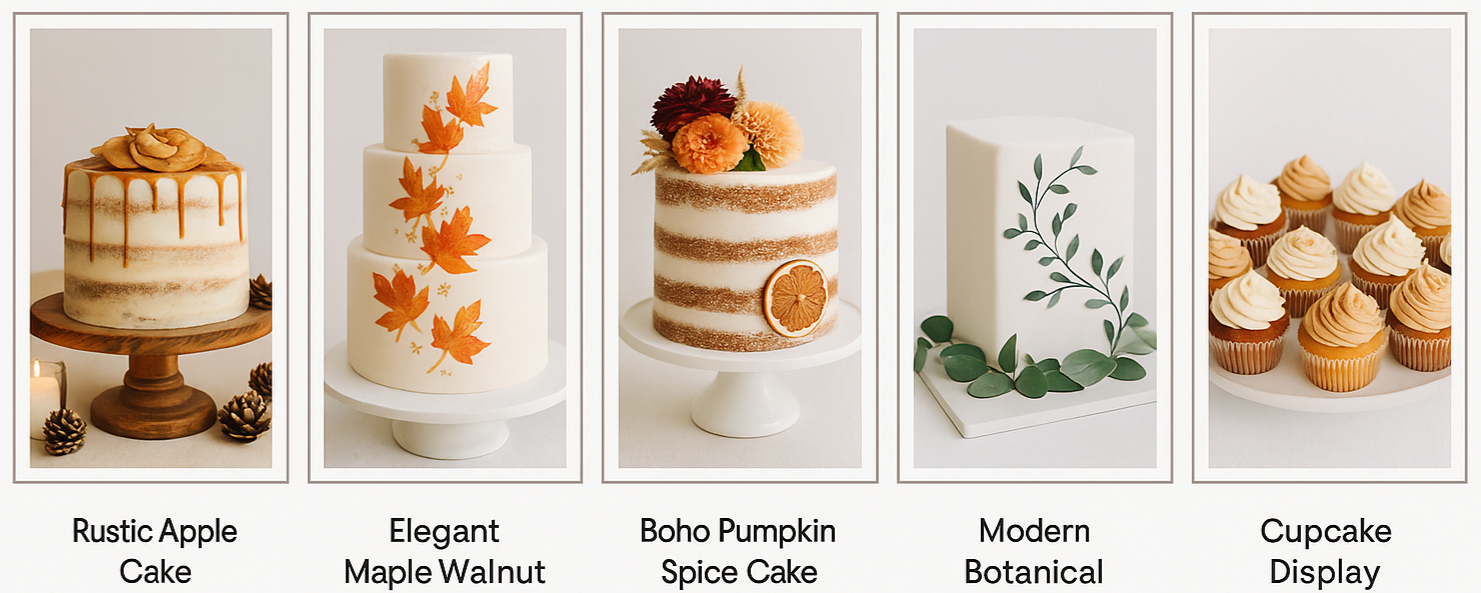
- Rustic Apple Cake: A cinnamon apple cake with semi-naked frosting and caramel drizzle looks stunning on a wood stand surrounded by candles and pinecones.
- Elegant Maple Walnut Cake: For a more formal event, a three-tier fondant cake with gold leaf and sugar maple leaves makes a statement. Inside, layers of maple walnut sponge and brown butter filling offer rich flavor.
- Boho Pumpkin Spice Cake: A naked pumpkin spice cake with fresh dahlias and dried orange slices feels organic and laid-back. Pair it with chai cupcakes for guests to enjoy.
- Modern Botanical Cake: A square gingerbread cake with white fondant and hand-painted vines creates a minimalist yet dramatic effect. Eucalyptus leaves at the base complete the look.
- Cupcake Display: Mixing flavors like chai, carrot, and maple in cupcake form adds variety and gives guests the fun of choosing their favorite.
Conclusion
Fall wedding cakes bring together the best of the season—warmth, richness, and beauty. From spicy pumpkin and chai to deep maple and apple flavors, every bite can reflect your love story. The look of your cake, whether rustic or modern, adds to the magic of your fall wedding day. It’s not just dessert—it’s a reflection of the moment, the colors, and the memories you’ll carry with you.
Key Takeaway: A fall wedding cake is more than something sweet—it’s a seasonal masterpiece. With the right flavors, textures, and details, your cake becomes a meaningful and memorable part of your celebration.
FAQs
What’s the best frosting for a fall wedding cake?
Cream cheese frosting and brown butter buttercream are top picks for fall. They complement spiced cakes beautifully and hold up well in cooler temperatures.
Can I add alcohol to my wedding cake for flavor?
Yes, adding bourbon, rum, or brandy to cake layers or fillings enhances fall flavors like caramel, maple, and spice. It gives the cake a warm, grown-up twist.
Is it okay to mix cake flavors in one cake?
Absolutely. You can choose different flavors for each tier—just let your guests know what’s what when serving or labeling the slices.
How can I make my fall cake fit my color theme without using typical fall colors?
Stick with neutral tones and bring in texture instead. Add natural touches like figs, cinnamon sticks, or metallic accents like gold foil to create subtle fall charm.
Should my cake match my floral arrangements?
Matching isn’t required, but coordinating helps create a unified look. Using similar flowers or greenery on your cake can tie your design together nicely.